Plywood Pendant Lamp
I saw a wood pendant lamp passing a storefront window, and I liked the look of it. It was made from a bunch of bent lamination parts to form sort of a globe.
So I started fiddling with the idea of trying to cut it out of a sheet of plywood, and put it together sort of like a 3D puzzle.
9mm baltic birch plywood seemed to be a good place to start.
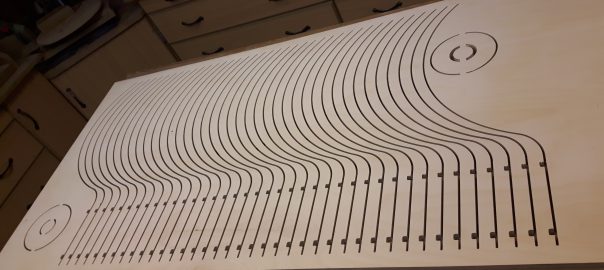
I drew up some shapes in Cad and fired up the cnc for my first attempt.

The slots and pockets was cut with an 1/8″ 2 flute downcut spiral bit. This left a small enough radius in the slots to not needing any more modifications.

I assembled it, but was not happy with how long the “neck” was. So I redrew the Cad drawing and ran it again.
This time i shortened the length of the neck, and also made the curve a little bigger, as I was going for a larger “bulb”

Here are some close ups of the cut parts.


To “free” all the parts, I ran it through the table saw on both sides.
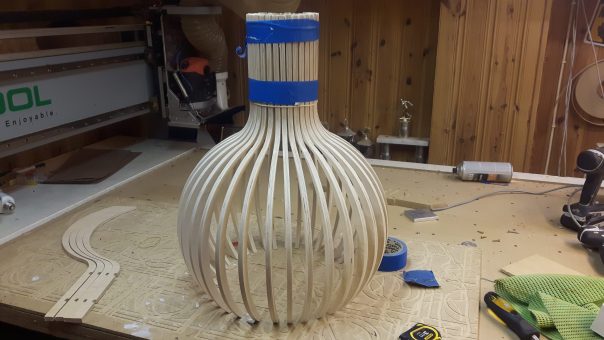
Then it was off to assemble the puzzle.
The sticks was only glued with CA glue and accelerator. And I was trying to space the sticks in such a way that they had an equal distance between them. It was kinda fun to do this glue-up.


To keep all the “sticks” equally spaced, and make the globe a little more rigid, a 4mm plywood ring was sketched. It has recesses the same size as the birch ply “sticks”. This also stiffens up the hole globe.


The 2 lamps side by side (PS, the top of the one on the right has not been sanded straight yet in this image :))

I chose to finish it with some Chinese oil.

This is how it came out after installation.

I did make a modification to the design after it was installed. Due to the effect of being” behind bars”, caused by the shadows from the sticks, I decided to recess the bulb, and also replace it with a halogen spot light bulb with a more narrow light casting angle.

I also drilled some ventilation holes in the top for some heat to escape.